Taking a snapshot of your computer screen is called a screenshot. Once captured, the screenshot is automatically copied to your computer’s clipboard. You can later paste the screenshot into a document, email, file, or image editor (such as Paint), save it as a file, and then insert it as an image into a document, email, file, or image editor.
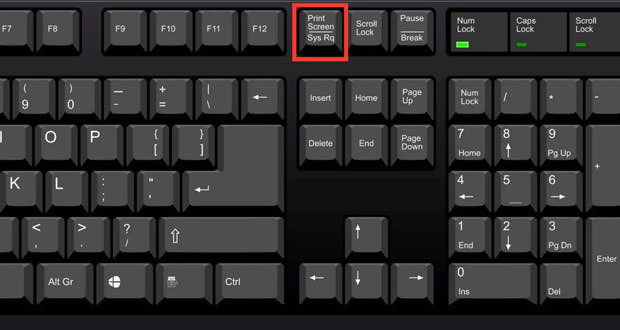
The keyboard of our computer consists of numerous keys, many of which are often ignored or unused. One of these is the ” Print Scr ” key, located at the top of the keyboard next to the widespread F12 key. Not everyone is aware that by pressing, it is possible to have the image of whatever is shown on the PC screen. In this guide, we will see how to use this simple but convenient button.
Save the image
If we have Windows 8 on our computer, the procedure we have to perform is really very easy. If we are faced with some image that we want to capture, we can press the Windows and ” Print Scr ” keys simultaneously. Our PC screen will go black for a few moments but don’t worry: the computer is just saving the image. Once this is done, we can see it directly by going to the ” Image ” folder.
Save a file
In case we don’t want the image to be saved, we can click on the ” Print Scr ” button. This way, the computer itself will automatically save the file. If, on the other hand, there is only one window we want to save, click on it and press ” Alt ” and ” Print Scr ”.
Remember that the PRINT key is generally found in the upper-right corner of the keyboard. On some keyboard models, the PRINT key appears in another way, such as PrintScreen, PrntScrn, PrntScr, PrtScn, PrtScr, PrtSc, or another similar abbreviation.
Capture an image
However, the situation is different if a version before Windows 8 is installed on our computer. First of all, we have to position ourselves on the page or image we intend to capture. Then we can press the ” Print Scr ” key.
Even if nothing happens, the computer still saved our file. To find it, go to the ” Paint ” program and open it. Then we press both the ” Ctrl ” and the ” V ” key at the same time. In this way, we will immediately see our image appear. If we want, we can also click on ” Edit ” at the top and then on ” Paste ” to ensure that the image appears on the screen.
Paste the image
We will have obtained the pasted image, and we have to save it to have it available on the screen and use it as we see fit. Still using ” Paint ” we must click on the ” File ” item and then on ” Save as ”.
Finally, we opt for ” Jpeg Image ”. After doing this, we will find ourselves in front of a window in which we will have to decide in which folder to save our file. Usually, the files are saved in the ” Image ” folder or on the desktop, but we can choose what we want. Finally, let’s not forget to save.
Capture the entire screen
To capture the entire screen: Press the Windows + PrntScrn keys simultaneously. On tablets, press the Windows key and the volume down key simultaneously (the screenshot is saved in the Screenshots folder of the Pictures folder). To acquire all active windows: press the PrntScrn key. To acquire a single active window: touch or click on the window to be acquired and simultaneously press the Alt + PrntScrn keys.
Note! The keyboard of our computer consists of numerous keys, many of which are often ignored or unused.

